The Observation Beehive is coming together!!! Keep following the channel and the blog for more information, we are also taking orders for custom furniture
Showing posts with label Kotarski. Show all posts
Showing posts with label Kotarski. Show all posts
Thursday, October 31, 2019
Friday, October 18, 2019
Observation Beehive Part I - Bringing Bees Indoors!
Check back soon, I'll get to writing this as soons as I can. I always add secrets in the blog for my fellow old school "readers" that can't stand videos starting every time they try to read a news article!
Friday, September 13, 2019
Monday, July 29, 2019
Carving a Square Bowl
Here's the latest bowl carving! This time around I decided to do a square platter from a chunk of Big Leaf Maple I've been saving in the corner of the shop. This time I went with a diamond embedded grinding disc on the grinder instead of the carbide tipped Graff Speedcutter that I used on the Root Bowl. The grinding disc isn't as aggressive so it takes a little longer but there is more control and less chance of accidental damage to the material.
 |
| Jason Michael Kotarski Jason Kotarski |
Friday, November 23, 2018
Finishing the Wood Carving Maple Root Bowl- Jason Michael Kotarski
The Big Leaf Maple Root Bowl is finished and ready to ship! It wad fun getting to finally use the branding iron my wife gifted to me for our "wood" anniversary. She just couldn't bring herself to find something in wood that I wouldn't say "I can make that", lol.
Check out the channel for more video as I hope to really expand the content during these rainy cold dark Pacific Northwest Winter days.
Jason Michael Kotarski- YouTube
Check out the channel for more video as I hope to really expand the content during these rainy cold dark Pacific Northwest Winter days.
Jason Michael Kotarski- YouTube
Thursday, October 25, 2018
WellHaus Barn Door is Hung!!!!!
I finally got the WellHaus Barn Door hung!!!! This has been a loooooooooong time coming and it feels great to see some achievement on this part of the project!!!! We're detailing out the casing design to creating a secure locking device with minimal air gaps. If you noticed the R-MAX ThermaSheath-3 shining on both sides of the door, your looking at the continuous insulation (CI) over the CDX plywood sheathing. While we will be going for R-6 in future builds, the R-3 will help act as a wind rain barrier (WRB) as well as a thermal break. This is essential for reducing thermal transfer through the framing system of the building. After we add some mineral insulation we should have R-23 in the walls (since we build with 2x6 exterior walls) and the R-3 Sheathing just like we did the roof and ceiling. This should give us some great thermal resistance along with some quality noise absorption.

Thursday, October 4, 2018
New Computer Build "GearGrinder"
Finally getting the pieces together for a new computer that can handle the amount of data I have with video editing in 4K HD with the Nikon D5600. Going to try and keep everything listed and up to date as possible as I acquire the various components.
Since I have been planning this for over a year I was able to keep my eyes open for some deals. Having my Google News preferences set on the list below I started seeing rumours that AMD was about to release a new, next Generation ThreadRipper 2990X. This means the last Gen should start being discounted to make room on shelves for the latest and greatest! I was able to score a combo pack on NewEgg that was exactly what I was after for a nice little discount! That takes care of the CPU with a AMD Threadripper 1950X and the ASUS ROG Zenith Extreme X399 Motherboard.
The Fractal Design Define R6 Full Tower Case happened to be on sale as well so I figured a little savings is better than no savings! Now for those pesky (and expensive) graphics proccessor unit! With Nvidia releasing the RTX 2080ti I thought I'd get a good deal on the GTX 1080Ti but alas, everyone else had the same idea and with the general specifications between the RTX and the GTX being close enough the cost savings on the older model are great, except there aren't very many left in stock.....
Now......to get some more parts.... Sponsorships or Discounts anyone????!??!!?!?!?!
GearGrinder on PCPartPicker
| Component | Selection | Price | ||
|---|---|---|---|---|
| CPU |  | $699.99 | GOT IT!!!! | |
| CPU Cooler |  | $159.99 | Buy | |
| Thermal Compound |  | $6.57 | GOT SOME!! | |
| $6.57 | Buy | ||
| Motherboard |  | $537.00 | GOT IT!!!! | |
| Memory |  | $276.99 | Buy | |
| Storage |  | $167.99 | Buy | |
| Video Card | 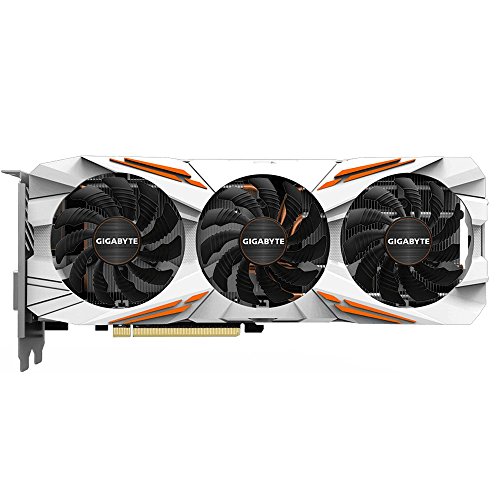 | $704.98 | Buy | |
| Case |  | $109.99 | GOT IT!!!!! | |
| Power Supply |  | $201.00 | Buy | |
| Operating System |  | $124.79 | Buy | |
| Sound Card |  | $149.99 | Buy | |
| Case Fan |  | $19.34 | Buy | |
| Monitor |  | $893.94 | Buy | |
| Total: | $4059.13 | |||
Thursday, September 27, 2018
YouTube Partner Program Back Up and Running!
Well, it appears I have not blogged on this site since February when YouTube announced the demonetization plans. I'll admit I do the majority of my writing and video editing during the dark cold months so it's only fitting that I restart with entry at the beginning of Autumn! After a long hot summer my Channel finally hit 1000 subscribers and the requisite 4000 hours of Watchtime per past 365 days. While this is by no means a windfall in the grand scheme of things, it is a good feeling.
A double wammy on the YouTube channel struck as the demonetization went lock and step with the laptop absolutely imploding. I put in a new motherboard, usb board, power button, 8 G ram stick, battery and power supply, NOTHING! the only thing left that was original is the fan but even with that unplugged I get no lights. I'll probably continue tinkering with it as I hate to give up when I'm defeated but we'll start the HP Pavilion 15 obituary soon. The more important thing is the next phase. I'll be adding some random tech entries (as if I know what the hell I'm talking about) as I build the next generation computer. Editing video shot with my new Nikon D5600 brought the laptop to a standstill reminiscent of my college days trying to render video, computer animation, and autocad files. We only had one computer in the lab for rendering and you had to sign up for a timeslot with your anticipated final files size! A stack of sticky notes was always handy to jot down your name and location (ie, coffee shop, bar, couch...) as we didn't have cell phones!
Stay tune and check out the build, I'll have some YouTube videos coming up as well and a list of parts still waiting for funding on over on my Patreon page!
Thursday, November 16, 2017
Upgrading to the New Nikon D5600 DSLR
Awhile back I made the decision to up my game a little bit in terms of photography. After cycling through several point and shoot cameras that had dismal battery life and frustratingly small storage capabilities with relatively crappy resolution it was time to do some real documentation. For those of you who stumbled upon this blog from my youtube channel, you'll be happy to know that future projects will be filmed in HD!
So after playing with the settings, reading several other blogs and watching some youtube videos I feel comfortable announcing this new upgrade. All in all I am very happy with this camera, not the highest end of the spectrum but right where I need to be between amateur and semi-pro. The video feature is limited due to both over heating and apparently some stupid import tax on the difference between cameras and video cameras, kinda sucked finding that out after I bought it.
So in the future some of my blog posts will be far less text and alot more pictures! Here's tow links to the Nikon D5600.
And here are the first few photos.....................


Wednesday, October 18, 2017
Jason Michael Kotarski on Amazon Handmade
Well the rains have finally arrived which means it's officially the wet season. As we prepare for the Long Dark we will be moving into the shop which means there will be more blog posts and more youtube video posts and more items going into the inventory. I'll be trying to ramp up production and get more items listed for the Amazon Handmade store. We stopped using Etsy awhile back as we couldn't compete with the manufacturers that were taking over. Amazon Handmade has a bit more rigor to ensure that the small production custom craft artists have a chance in today's mass manufacturing world.
So take a peek and keep checking back to see what's new. I can always do custom orders as well and if you see something that strikes a chord let me know!
 |
| Jason Michael Kotarski |
 |
| Jason Michael Kotarski |
 |
| Jason Michael Kotarski |
 |
| Jason Michael Kotarski |
Sunday, April 9, 2017
Part IV Installing Sapele on the Wood Accent Wall
Well, I'm finally getting some progress on the wood panel accent wall. I'm going to also link some of the tools I used in this project below if you want to check them out. The tools I use are the ones that I have found are the best bang for the buck. Are there better ones, yea for some of them, are there cheaper ones, of course, but I use these daily so I need them to give me the best performance at a reasonable price so that I can get the job done.
Jason Kotarski
Jason Michael Kotarski
Jason Kotarski
Jason Michael Kotarski
Friday, March 31, 2017
Thursday, March 30, 2017
Part III Wood Panel Accent Wall
Getting some panels on the wall and decided in order to stretch out the 1 x 10 Sapele boards so I can use the best ones and have left overs for smaller projects. Simple Board and Batten style panel and a handmade piece of trim from the router table. It all sits behind a black entertainment stand and stereo components. It's going to look pretty slick once the beautiful Mahonganhy like Sapele goes on top and the black flat screen is mounted to the wall. I'll come back and install the media boxes from the back side as the closet is the next to be redone! I added a layer of 1/2" sound board over the sheetrock so with 5/8" Gypsum, 1/2" fiber Soundboard, and 3/4" Sapele we should get get reflection from TV's rear speakers back into the viewing space while absorbing sound with the sound board and gypsum. And don't worry, when we redo the closet next we'll add Roxul Safe and Sound in the wall cavity, another layer of soundboard and GWB.
To be slick about it I used leftover 3/4" A/B Sanded cabinet grade plywood with 1/2" bead board. That made the 1/2" soundboard and 3/4 Sapele flush! More contemporary than I typically design but hey, something new!
Check out the 15 Gauge Nailer from Porter Cable
To be slick about it I used leftover 3/4" A/B Sanded cabinet grade plywood with 1/2" bead board. That made the 1/2" soundboard and 3/4 Sapele flush! More contemporary than I typically design but hey, something new!
Check out the 15 Gauge Nailer from Porter Cable
Wednesday, March 29, 2017
Social Media and My Generation
I have found that there are two sides to my generation (and other generations as well but I'm not in those generations so I can't speak to that) when it comes to social media, those that can't live without it and those that have to live without it. A classic case of the have's and have not's. well not exactly.
When social media came out I was in college and like most found it a great way to share experiences across the globe as my network grew further and further in terms of distance. I couldn't keep up with it then and I sure as hell can't keep up with it now. When social media started creeping into the lexicon of my work colleagues I was immediately concerned. For the social butterfly this was an eureka moment if there ever was one but for me, I saw the danger in friending my boss for them to see my monster catch out on the water while I had the flu.
As the movement spread, I remember the first time I heard someone say they were the Social Media Director, and a couple of agencies posting adverts for social media coordinators. Sure, there has been some sort of Public Affairs and/or customer relations but this seemed dubious to me. Someone had an office (bigger than mine) that was on Facebook all day? Meh, I had my own projects to work on and they could have their fun.
Turning to today as I struggle to find the centre point in my triangle of entrepreneur, technician and manager, I have realized how freaking time consuming this all is. So much so that I have less to show on my social media because I was busy working on social media. It is the same as working on a portfolio in the old days when you had to physically carry the portfolio around and the construction of the portfolio was as important as the elements of the portfolio. You would spend so much time crafting your portfolio that there wasn't much to put in it!
So, it' 10:20, break time just ended and all I have to show for it is a handful of emails, posts, updates, editing, and general buggery. I wonder how many more platforms will be created this year?
So if you haven't checked out my sites (or ever read this anyway) I'll up date this when I create a copy and paste list of all these sites as links.
Jason Michael Kotarski.com
Spatial RecognitionDesign.com
youtube - https://www.youtube.com/user/jkotar20
JasonMichaelKotarski.blogspot.com
twitter @_KOTARSKI_
Facebook SpatialRecognition
twitter @SpatialRecog
Houzz Spatial Recognition
Thumbtack- Spatial Recognition
Porch- Spatial Recognition
Linkedin- JasonMichaelKotarski
Craigslist Jason Michael Kotarski
Craigslist Spatial Recognition
Friday, March 10, 2017
Permaculture- Installling my first beehive
I've been planning to so this for over five years. I would go to beekeeping speaking events, check out books from the library, search and research articles and forums on the net but never did it. I have always had animals, dogs, cats, etc.... but never any livestock or an apiary. I finally decided to just go ahead with some leftover pieces of plywood someone had given me. They're plywood but at least they are 3/4 inch, 7 ply, A/B cabinet grade plywood! It did occur to me as I lay on the couch drifting into sleep that I forgot to add and entrance. OOPS! No worries, I'll get the jigsaw and do a quick little cut, I should have time still before any swarming occurs. It's still hovering around 40 F so I'll get to it.
I learned through my research that black or dark colored clothing was the worst option for beekeepers. Well, the plywood used to be a school theatre set and it was already painted black. Turns out it's not that bad actually for the hive and more than one long time beekeeper noted they do better than their other colored ones. Well, it is what it is and if they can make a hive in a old tire I think they'll be fine. Besides, I think they'll get morning sun to warm up and afternoon shade to stay cool along with a breeze off of the lake. Well, I guess we'll see!!!
Now, remember that blueberry mead I made? Oh yea, it'll bee back soon!
Monday, February 27, 2017
Stone Carving- The Granite Fieldstone Mortar & Pestle
This was my third finished mortar and pestle/ stone bowl. I've come up with a different way to create a "lathe" with the grinder. I am going to put to pipes on bearings mounted on the block of wood you see in the video. The friction from the grinding wheel will spin the piece like a cylinder and leave my hands free from touching the small piece of stone. I plan to do another larger one for the WellHaus pump basin that will also have a drain bored through it out to the greywater system in the future GreenHaus.
 |
| Jason Michael Kotarski Jason Kotarski |
Friday, November 13, 2015
Field Stone Foundation Pier for the WellHaus
To start the WellHaus we took a look at the slope to determine where the lowest point was, and that just happened to be the Northwest corner. As this is the lowest point, it will be the tallest pier. With the finished height targeted at below 30 inches we are looking to establish enough height so that the on the mountain side remain above grade. This also will allow us to have a deck that does not require a balustrade.
To determine where our corners would be we needed to take into account all of the restrictions and conditions present. Knowing that we want to stay under 200 square feet we selected the site and upon analysis we decided the site condition really only allowed somewhere near 200 sqft. With that in mind we took to configuring out plan, a rectangle is the most efficient shape for a work space.
Step 1- Draw it out!
Step 2- Set your forms. Pull centre from your batter boards and measure your height. For our rebar risers we're gonna go sustainable ( ok ok cheap) and clean up the site by breaking the bricks length wise to use the holes as rebar holders. Tie the rebar together with wire and drive four 3 foot sections of rebar into the ground per detail section.
Step 3- Mix and pour your concrete,
Step 4- Go and find some stone!
Step 5- Watch the Laying a Fieldstone Pier video
To determine where our corners would be we needed to take into account all of the restrictions and conditions present. Knowing that we want to stay under 200 square feet we selected the site and upon analysis we decided the site condition really only allowed somewhere near 200 sqft. With that in mind we took to configuring out plan, a rectangle is the most efficient shape for a work space.
Step 1- Draw it out!
 |
| Pier Detail |
 |
| Pier footing form |
Step 3- Mix and pour your concrete,
 |
| Poured concrete footer |
 |
| Stone pile |
Step 5- Watch the Laying a Fieldstone Pier video
 |
| Fieldstone pier |
And there you have it! The cast concrete capstone was also made on site. The final step here will be to screw a temporary skirt board on the framing to create a form to pack high strength grout between the capstone and the framing on the inside corner. Notice the "Floating Column" making a cameo appearance! More on that later! Cheers.
Tuesday, November 10, 2015
Time Changes
The memories of Summer still linger, stored with a smile as to not forget the warm dry sunshine. What a great Summer though, the Fall harvest was early and Autumn waited for the calendar to filp to October. The rains are upon us and as one might predict came with the remnants of a hurricane off the Pacific.
With Day Light Savings kicking in, it's dark before 5 o'clock which doesn't leave much time to be working outside. With that in mind I feel less guilty about sitting at the computer so I hope I'll have more time to write, edit and publish. It seems as though blogs are out of date and I get more traffic on my Youtube channel than I'll ever see on here.
Regardless! I have a whole summer of projects to document, so I'll try to spend equal effort in writing as videography.
This will be the first Winter since we switched out all off our lights to LED's. That should be a huge cost savings but more importantly, BRIGHT! Next on the list is the exterior lights and now that it's dark so early I'll have to be getting on that.
It's nice to not have those voids where the compact fluorescent bulbs were. Also, the CFL's took awhile to warm up in the winter, it was kinda of like a slow glow that was easy on the eyes in the morning but good luck finding anything before work.
With Day Light Savings kicking in, it's dark before 5 o'clock which doesn't leave much time to be working outside. With that in mind I feel less guilty about sitting at the computer so I hope I'll have more time to write, edit and publish. It seems as though blogs are out of date and I get more traffic on my Youtube channel than I'll ever see on here.
Regardless! I have a whole summer of projects to document, so I'll try to spend equal effort in writing as videography.
This will be the first Winter since we switched out all off our lights to LED's. That should be a huge cost savings but more importantly, BRIGHT! Next on the list is the exterior lights and now that it's dark so early I'll have to be getting on that.
 |
| Because this is ugly |
 |
| Because this is efficient |
 |
| Becauase Damn, now I have to paint the ceiling |
It's nice to not have those voids where the compact fluorescent bulbs were. Also, the CFL's took awhile to warm up in the winter, it was kinda of like a slow glow that was easy on the eyes in the morning but good luck finding anything before work.
Oh yes, I have more projects to show but the sun is out and that is rare so I better be getting on.
Saturday, April 11, 2015
The Ivy War
The Great war started like all others before it. After a few initial contacts the differences between the two sides were slowly magnified, like a scientist zooming in with a microscope so close that the resemblances of what was and what is became vastly different. A small grievance that evolved into contempt, pitched battles, proxy wars and ultimately direct open conflict. The slippery slope and the fog of war compounded the decent.
As I looked across the landscape I was annoyed by an incursion into our territory. After scouting and an investigation I had found the enemy had penetrated deep into our area and was establishing a foothold. What I thought was an establishment of agreed upon lines was actually the launching pad for their offensive. Having spotted this just in time I was able to beat back the incursions and reestablish the front lines.
This is how these things start and slowly unravel. I went to battle at first with light weapons and now it has become a series of pitched battles, tactical warfare with strategic purpose. Having taken out my first salvo, I descended into the woods. The Ivy had worked its tendrils into every garden bed and taken over the hill. They had taken the high ground and were choking us out with a patient siege and war of attrition that we could not sustain. I broke the siege by cutting them off at the base.
The initial pitched battles are showing signs of stabilization with new habitation in the controlled sectors. These are becoming excellent rear guards to sustain our Forward Operating Bases (FOB).
Oh adversary Ivy and your proxy Blackberry, we will defeat you and on the fourth day of the month of July we will declare our independence and watch you burn in the flames of our success!
As I looked across the landscape I was annoyed by an incursion into our territory. After scouting and an investigation I had found the enemy had penetrated deep into our area and was establishing a foothold. What I thought was an establishment of agreed upon lines was actually the launching pad for their offensive. Having spotted this just in time I was able to beat back the incursions and reestablish the front lines.
This is how these things start and slowly unravel. I went to battle at first with light weapons and now it has become a series of pitched battles, tactical warfare with strategic purpose. Having taken out my first salvo, I descended into the woods. The Ivy had worked its tendrils into every garden bed and taken over the hill. They had taken the high ground and were choking us out with a patient siege and war of attrition that we could not sustain. I broke the siege by cutting them off at the base.
 |
| Jason Kotarski |
Thus the battle begun. The small hatchet and machete struck the first blows. The ivy fought back, grabbing ahold of my foot and tripping me causing a tumble. I didn't even notice the Ivy had allied with the Blackberries causing a mess to my fingers, hands, arms, and face. I ratcheted it up a notch and invoked fire to burn through the root mass that had strangled the landscape to death. I hacked and piled and torched small circles to the earth and tilled the ashes and tinder to the soil. I was moving the frontlines of the war and in these circles I planted our counter offensive. The ivy had strangled the native species and specimen plants leaving behind a green carpet of landslide danger. The counter offensive was to reinforce our position and entrench the battle lines.
 |
| Jason Kotarski |
The enemy had infiltrated our transportation corridor necessary for supply lines and reinforcements. The rocks were to be our foothold and we had to press the advance.
 |
| Jason Kotarski |
We spotted the enemy position and plotted our attack. We would wait for a Saturday when the enemy would be vulnerable and waited for the sun to set to mask our movements before we sprung our trap. We had flanked the enemy and were advancing on two fronts in a pincer movement to divert the attention of this infiltrator. They were deeply entrenched in their position and we invoked Sun Zhu as we planned to hold our ground. It was hand to hand combat, grappling and twisting, pulling and wrestling to yank them from the trenches.
 |
| Jason Kotarski |
The southern flank had succeeded but we knew we would be tested on this side again. By only attacking the exposed positions we left the main forces to regroup later. We need to establish an observation post to monitor the situation.
 |
| Jason Kotarski |
The initial pitched battles are showing signs of stabilization with new habitation in the controlled sectors. These are becoming excellent rear guards to sustain our Forward Operating Bases (FOB).
Oh adversary Ivy and your proxy Blackberry, we will defeat you and on the fourth day of the month of July we will declare our independence and watch you burn in the flames of our success!
Sunday, March 1, 2015
Spring Time!!! Mason Bee House
As the Winter thaws and the blooms are budding I started building Orchard Mason Bee (Osmia Lignaria) Houses to put around the yard and hopefully the whole neighborhood should anyone ask for some. Super simple and straight forward, to start I drilled out a block of wood and capped it with some cedar for a roof.
If I get the chance I will try to pick up a pack of cocoons with larvae. I am going to try several variations of the houses and see which ones get the most action. This one is near the blueberries tucked up against a tree for rain protection and facing the morning sun.
 |
| Jason Kotarski |
If I get the chance I will try to pick up a pack of cocoons with larvae. I am going to try several variations of the houses and see which ones get the most action. This one is near the blueberries tucked up against a tree for rain protection and facing the morning sun.
 |
| Jason Kotarski |
With an ample supply of water and mud, I hope these little friends move in and help us with the garden! I'm excited to see how this year's harvest goes. We expanded the blueberry patch this year with four more bushes and are looking at four more next year.
Subscribe to:
Posts (Atom)